Potato chips and "junk food" often come to mind when one thinks of Snacks. Low Salt High Fibre Biscuits are perfect for those snack cravings or just when you don't want to fill yourself up! (:

Tuna Spread:
1 can Tuna in Water (drained)
1 1/2 tbsp Mayonnaise
Lemon Juice to taste
Drain tuna solids of brine. To reduce sodium content even more, soak meat in distilled water for a few minutes and drain well. Make sure meat is dry,
or else it becomes soggy. Add Mayonnaise and Lemon Juice (don't put too much at a time!), and use a fork to mix it well. Spread on biscuit or toast.
Tip: Low sodium canned tuna in water is locally available; some brands I found are Bumblebee and TC Boy. You can also use low-fat mayonnaise instead.
I melted 1/2 a piece of Hokkaido Cheese on a biscuit for some variation. Another favourite is Swiss Emmental, especially since several brands have significantly lower sodium than regular cheeses. Try to limit the cheese to not more than 1 serving if you are on a low phosphate diet. :(


[get this widget]
Snack: Tuna and Cheese Biscuit
Labels: -cereals, -cheese, -fish [tuna], [high Fibre], [low Sodium], Finger-food, Instant, packaged, snacks, spreads May 31, 2008Recipe: Tom Yam Talay
Labels: -seafood, *Favourite Recipes, ~Thai, Comfort Food, Mum's recipes, recipes, soups, spicy May 29, 2008Thai Clear Hot and Sour Seafood Soup

A favourite Thai recipe from Food and Travel magazine which my Mum edited slightly. Change the ingredients to suit your preference. This is the clear version, and does not require any paste. I love the spicy and sour kick!
Ingredients:
1 stalk Lemongrass
1 thumb-length Galangal
2 Kaffir Lime Leaves
3-5 pcs Chilli Padi (to preference)
Juice of 1 large Green Lime
2 tbsp Fish Sauce
About 600-700ml Water
Straw Mushrooms
Prawns, Fish Slices, Squid
Method:
1. Put chilli padi in a small permeable bag and put into a pot.
2. Place soup ingredients in and boil until fragrant and seafood is cooked. Remove the bag of chilli padi when spicy enough.


[get this widget]
Hakka Beef Balls
Labels: -beef, *Favourite Haunts, ~Hakka, eatout, hawker, kopitiam, Mains, noodles, soups May 27, 2008The Beef House: Hakka Beef Balls
This dish is very rare in Singapore, and I've yet to come across another place selling handmade Hakka Beef Balls like this one.

This stall makes their own large ping-pong sized beef balls, and you can see the rough texture from all the "handiwork". They are very bouncy and biting these reminds you of non-wobbly konnyaku jelly. I love the yellow Hakka-style noodles (usually eaten with Yong Tau Foo) which they also serve. Unfortunately they just ran out clean, so only bee hoon is left.
I sometimes take-away their beef balls to go with noodles or soup at home. They also serve other Hakka foods like Abacus Yam and Yong Tau Foo.
217 Syed Alwi Road
Gar Lok Eating House
(9am to 6pm; Closed on Fridays)


[get this widget]
Original Sungei Road Laksa
Labels: -coconut, -curry, ~Singaporean, eatout, hawker, kopitiam, laksa, Mains, noodles, soupsSungei Road Laksa
There are a lot of stalls claiming to be the famous Sungei Road Laksa, but my Mum (who knows her stuff) says this is the very original.

There is a story behind the Sungei Road Laksa, and to this very day the owner is still using charcoal fire to warm his laksa gravy. The laksa is the "Singaporean version", unlike the Katong Laksa. You are served only a spoon like the Original Katong Spoon Laksa, so noodles are cut into small strands. At only $2 a bowl, it is really reasonable and they also serve it with cockles, fishcake and fried chilli.
Jin Shui Kopitiam
Block 27 #01-100 Jalan Berseh
P.S. Surprisingly, (or maybe not) I've never liked Laksa since young, so this is based on my Mum's account!


[get this widget]
Recipe: Pan-Grilled Beef Tenderloin
Labels: -beef, [high Phosphate], [high Protein], [low Sodium], +grilled, ~Western, Mains, marinades, recipesI was lazy to take the MRT down to Novena, so I settled for an Australian Beef Tenderloin ($8/170g) from NTUC. Tenderloins are tender (as the name suggests), but also relatively lean and less flavourful. The cuts are also usually small but thick, so it's harder for the heat to cook the insides of the meat. As much as I like my steaks medium-rare, I don't want to get salmonellosis.

I used a light herb baste with a hint of red wine. Spread the baste evenly over the meat just before grilling.

Herb and Red Wine Baste
2 tbsp Olive Oil
2 tsp Thyme
2 tsp Garlic Powder
2/3 tbsp crushed Parsley
1/2 tbsp Cooking Red Wine
Grilling: Ground Black Pepper and Salt
1. Heat up the grill pan on high heat. Meanwhile, baste the meat evenly.
2. Put the meat on the grill pan and leave it untouched for 5 to 7 minutes. (for 3 to 4 cm thickness) Do not press the steak or the juices will escape.
3. When the meat has turned a dark char with nice grill-marks, sprinkle some black pepper and/or salt, and turn it over using a pair of tongs.
4. Once flipped over, sprinkle some black pepper and/or salt on this side. Leave it on the grill depending on thickness and preference.
5. Remove the steak onto a (preferably) warm plate and let it rest for 4 to 5 minutes. This allows the juices inside to redistribute.
6. Serve with garnishing and vegetables. (:


[get this widget]
The Real McCoy: Ni Tamago!
Labels: -egg, [high Phosphate], [high Protein], +boiled, ~Japanese, marinades, recipes, Starters May 26, 2008Following the previous unexpected surprise with my attempt at making Ni Tamago, I tried making the real, authentic one this time. Taking extra care at my timing, I finally did it! A successful, authentic Ni Tamago!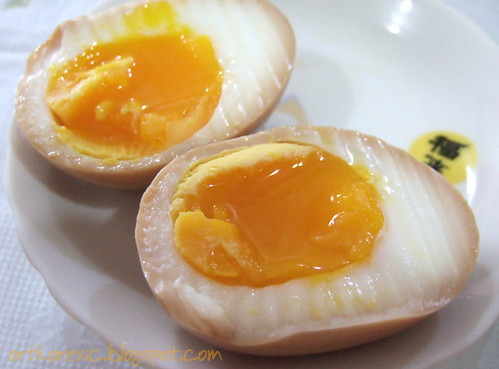
The recipe is similar to the previous, except I boiled the eggs for a minute longer (6 minutes). Also, I added mirin to the braising liquid, lending a hint of sweetness.
Click here for Chubby Hubby's recipe.


[get this widget]
Recipe: Shiitake and Friends Creamy Mushroom Soup
Labels: -cream, -mushroom, [low Sodium], *Favourite Foods, *Favourite Recipes, #Originals, +boiled, ~Western, Comfort Food, dairy, recipes, soups, Starters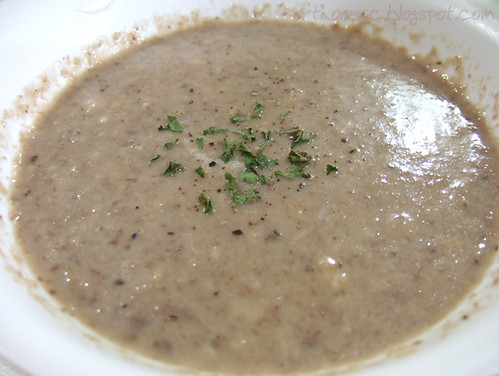
I love Cream of Mushroom Soup, especially those greyish kinds with bits of mushroom pieces in. The yellow-white/pale ones remind me of Campbell, lots of cream but very little mushrooms. This is my very own recipe for a low salt Cream of Mushroom Soup. I use lots of Shiitake mushrooms because they are very fragrant, and together with other mixed mushrooms, I call it "Shiitake and Friends"! I'm very proud of this because it was successful on the first attempt! (:
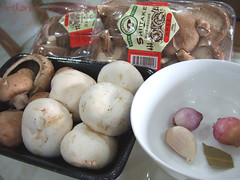
Ingredients:
1 packet (200g) Shiitake Mushrooms
1 packet (250g) Mixed Mushrooms
1 clove Garlic, crushed
2 small Shallots, minced
1/2 or 1 Bayleaf
3 tbsp Full cream
1/2 cube Vegetable Stock
70g Butter
700ml to 800ml Water
Salt, Freshly Ground Black Pepper
A dash of Parsley (Optional)

1. Heat a pot on medium fire. Meanwhile, crush garlic, mince shallots and dice all the mushrooms into small pieces.
2. Melt the butter in the pot.
3. When all the butter has melted, add in the shallots and garlic.
4. Fry for about 3 minutes.

5. Now, add in the mushrooms. Keep stirring so that the mushrooms on top also get fried by the butter at the bottom. Make sure the mushrooms are well mixed, and fry for about 6 to 7 minutes. The mushrooms should be glazed and not dry and spongy.
6. Add the hot water and vegetable stock. Stir and boil for 5 minutes or until the stock cube has melted completely.
7. Add full cream and stir well until the soup becomes thick.
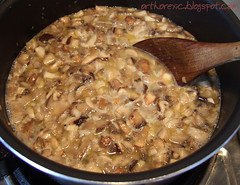
8. Lower the heat and simmer for 15 to 30 minutes. Meanwhile, stir regularly. If you see a layer of oil forming on top of the soup, scoop it out and discard.
9. Blend the soup in a blender. If you like a chunky soup with bits of mushroom, separate the soup into two parts. Blend the first part until it becomes thick but not chunky. Then blend the second part to desired fineness. Do not blend too much if you like to chew on bits of mushroom in your soup.

10. Serve warm with a dash of parsley and/or freshly ground black pepper. Also goes well with toast, garlic bread or pasta. Bon Appetit! (:
Note: This is the low-salt version of the soup. You should add salt to taste just before serving or let guests help themselves with the salt-shaker.
You can make variations of the soup with different mushrooms. Porcini, Portobello, Button and Swiss Brown are all great mushrooms for this recipe. For a smoother, less chunky soup, you can either blend it more finely, add more cream or add less mushrooms.


[get this widget]

Mum got me a new grill pan from Takashimaya for only $39.90 and I tried it out on the remaining Rack of Lamb in my fridge.
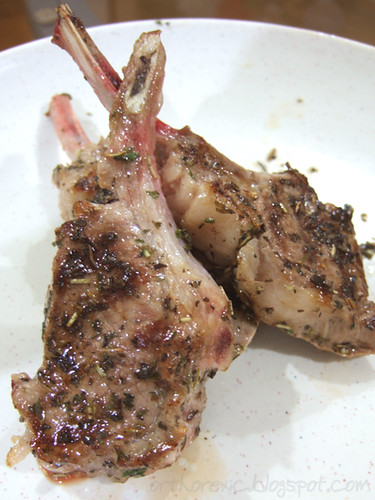
Ooh I just love the 'burnt lines' on the meat! And somehow the lamb seems to have more juices locked in! Or is it just psychological? :) Anyway I love my new kitchen tool!!


[get this widget]
Original: XY's Ni-Tamago
Labels: -egg, [high Phosphate], [high Protein], *Favourite Recipes, #Experiments, #Originals, +boiled, ~Japanese, Cool Foods, recipes, StartersNi Tamago is a special Stewed Japanese Egg where the egg white is firm, but the egg yolk inside is still slightly runny. It is usually an accompaniment to Japanese Ramen, and it takes quite a few hours to make. Here is Chubby Hubby's recipe to making Ni Tamago.
My Ni Tamago's yolk was far too raw compared to the authentic, but when I ate it really cold, it turned out extremely delicious like Onsen Tamago with a firm egg white. The yolk literally slides down your throat along with the tasty white. Extremely refreshing served really chilled.
Here's my Version
Ingredients:
3-4 (Chicken) Eggs
Soy Sauce Liquid:
2 parts Light Soy Sauce
1 part Oyster Sauce
1 tbsp Dark Soy Sauce
Water
[You can replace Oyster Sauce with mirin for a sweeter taste)
Method:
1. Bring some water to a light boil and add eggs from refrigerator directly in.
2. Make sure it's bubbling but not boiling too hard so that eggs do not bobble around.
Medium Egg: [5.5 minutes]
Quail Egg: [3 minutes]
Timing: (For doneness pictured above)
Medium Egg: [5 minutes]
Large Egg: [6 minutes]
3. Remove from water and immerse eggs into a container full of icy-cold water for about 3-4 hours. Chubby Hubby uses an ice bath with vinegar though.
4. After that, dry the eggs and carefully (really carefully, you don't want to break the yolk) peel the shell.
5. Immerse the peeled eggs in the seasoning liquid for at least 3-5 hours, or overnight.
6. Serve really chilled!
Note: Be prepared to do this many times to get the timing/heat right! I failed many times before I got the results I wanted, so experiment and practise! Some may prefer a more well-done yolk, others might like it a little raw. Be patient and the result will be worth it!


[get this widget]
Friends @ Chomp Chomp
Labels: -beef, -mushroom, -pork, ~Modern European, Dessert, dining, eatout, pasta, salads, soups, steakMy parents came back home so we all went out for dinner at Friends @ Chomp Chomp (located at Serangoon Garden Village) for a dinner. We actually wanted to go to Aston's Express, but it was closed that night. My parents were apprehensive at first, at the thought of it being "casual fine-dining", but I told them they didn't need to be all dressed up to enter. ;)
First up was Wild Mushroom Soup for me and Dad.

This was delicious, but I think the chef deliberately made it bland so you can add the salt and pepper to your own preference. This was the soup that made me decide to try making my own!

Mum ordered the Spanish Dinner Set, which started with Marinated Eggplant with Raisins and Pine Nut, Mesclun Salad and Herb Vinaigrette.

Her main course was Stuffed Pork Cutlet with fig, olive and almond, served with mashed potato and fried beans. I love beans and mashed potatoes! Dad had the Char-Grilled Tenderloin (220g) which I stole quite a lot of! It was done medium rare as per request and it was really very tender and pink inside!
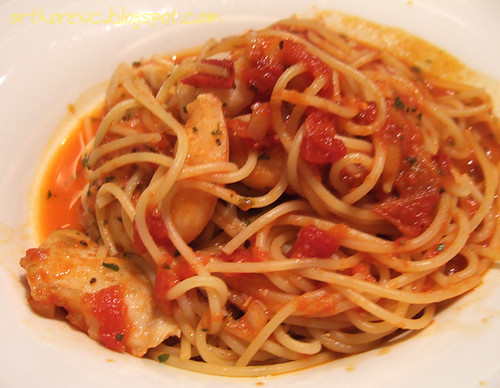
My main course was Seafood with home-made tomato sauce, essentially a Marinara Spaghetti dish. I didn't really like it... a little too garlicky for my taste, but that's just me I guess. :/ The pasta had generous amounts of seafood plus HUGE prawns, though. Aunt finished up every last bit of her Bacon Spaghetti Aglio Olio!

Mum's set included an Orange Crème Caramel. Actually it was more of a Crème Brûlée because the top layer had a burnt sugar crust. It came with vanilla ice cream and some (artistic?) syrup at the side.

I had half of Mum's share! This was my first Crème Brûlée, and I loved it, even though I don't have a sweet-tooth. The combination of a sugary crust and a custardy caramel beneath really tasted good. (:


[get this widget]
MarketWatch: Hokkaido Cheese
Labels: -cheese, [high Calcium], [high Phosphate], [high Protein], [low Sodium], *Favourite Foods, *MarketWatch, ~Japanese, dairy, packaged, snacks, spreads
My aunt and uncle just came back from their visit to Hokkaido, and brought back some delicious Limited Edition Hokkaido Scenery Cheese by Snow (brand). The cheese is delicious and had a creamy full-bodied flavour, and at a really low sodium content at 224 mg per 100g! The calcium is not bad for a cream cheese at 115 mg per 100g. Pity the inevitable high phosphate for all diary products, though.
Every cheese has a label with an illustration of parts of Hokkaido on it! Could be a collector's item. ;)


[get this widget]
Experiment: Sweet Honey-Baked Wings
Labels: -chicken, [high Protein], #Experiments, +baked, ~Western, Finger-food, marinades, recipes
Something I experimented with a few days ago. It turned out a little stickier than I expected, and I used 1/2 teaspoon salt, so it wasn't tasty enough. I ended up using the toaster instead of the oven. But I thought it was a pretty good attempt. (: You can add some chilli pepper to make it spicy.
Ingredients:
6-8 chicken mid wings
Olive oil for coating
Marinade:
3 heaped tbsp honey
2 tbsp mexican chilli powder
3 tbsp garlic powder
2 1/2 tbsp onion powder
2 tbsp light soy sauce
1 tsp Worchestire sauce
Juice of 1/3 medium lemon
1 tbsp sugar
1 tsp salt
Some crushed parsley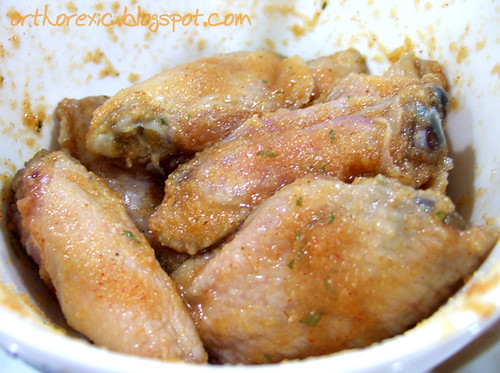
1. Mix the ingredients of the marinade together in a bowl and put the chicken wings in.
2. Mix the marinade with the chicken wings well with hands, then leave it in refrigerator for at least two hours.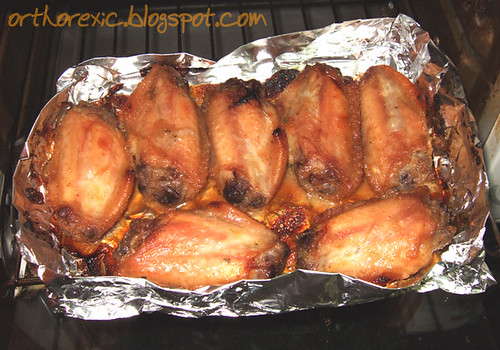
3. Pre heat the oven to 200 C. Bake the wings until they are cooked and turn golden brown.
4. Drizzle a little parsley on top and serve while hot!
Aunt also made some (lightly salted) fried potato wedges to go with the wings! Delicious! (:


[get this widget]
Camemberu: Nigella's Mirin-Glazed Salmon
Labels: -fish [salmon], -noodles, -udon, [high Protein], [low Calcium], #Experiments, +pan-fried, +stir-fried, ~Japanese, Mains, recipes May 24, 2008
I was wowed by Camemberu's delicious photo of Nigella's Mirin-Glazed Salmon recipe, so I tried it out. And it turned out really well!
3 1/2 tbsp mirin
2 tbsp brown sugar
4 tbsp soy sauce
1 large salmon fillet
2 tbsp rice vinegar
1.Mix mirin, brown sugar and soy sauce in a dish and marinate salmon fillet. Meanwhile, set the frying pan on high heat.
2.Place the salmon on the pan for 2 minutes, turn over and add the marinade. Cook for another 1 minute.
3.Put the salmon onto the plate. Add the vinegar to the pan.
[I put the salmon back onto the pan again, flipping after 1/2 a minute. I removed the salmon onto the plate after a minute.]
4.Pour the glaze over the salmon and serve.
Note: I tweaked the recipe a little from the original.
Wondering what carbo I should cook to go with the salmon, I ended up making another batch of sauce and frying it with udon in some oil, and got... Mirin-Glazed Salmon Yaki-Udon!!


[get this widget]
Ingredients
2 pcs French Cut Rack of Lamb
Marinade:
2 heaped tbsp Herbs of Provence (small individual packets available at MMMM! for 50c each)
1 tbsp Cooking Red Wine
1/4 cup minced onion
a pinch of black pepper
2 tbsp olive oil
dash of parsley/dried thyme/mint leaves
1/2 tsp salt [hb: do not add to marinade; sprinkle before serve]
Method
Pre heat the pan on high heat. Meanwhile, brush the Marinade all over the Rack of Lamb. if you have some time, make some extra marinade and leave the Rack of Lamb in the marinade for a while.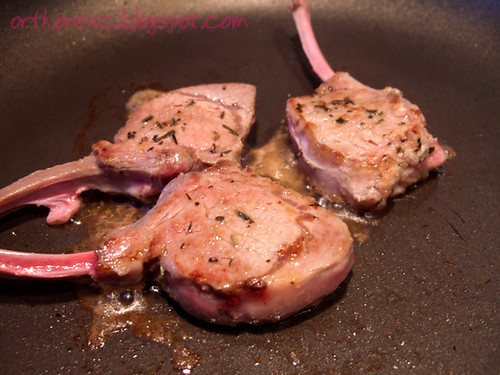
Put the Rack of Lamb on the pan when it's very hot. Leave it on one side for about 3 minutes or so, then turn over. For mine, I left it on the pan for about 3 and a half minutes on the other side. Touch the meat with a pair of tongs. It shouldn't be too squishy. For a first-timer like me, it's alright to undercook it because you can bring it back to the pan again. Take note of the timing so you can cook it to your preference next time.
Serve it hot on a plate. You might want to have some vegetables or garnishing. I'm not sure if you should leave it there for the juices to disperse (in the case of beef steak), so please do advise me on this. (: ...And there you have it--Bon Appetit!
*I go to Meidi-ya for their Rack of Lamb because it's not too fat and tender since the lamb is young (<1 year). They have pre-cuts or a whole rack at the counter for $9+/100g. The price is quite reasonable because they weigh it after they cut away all the fats.


[get this widget]
Mum's Breaded Cheese Pork Cutlet
Labels: -cheese, -pork, [high Phosphate], +deep-fried, ~Western, Mum's recipes, recipes May 20, 2008After watching the food series Buzzing Cashier, Mum decided to try out one of the chef's recipes: Breaded Pork Cutlet with Cheese... and here it is! It is similar to Cordon Bleu without the ham. Oooh look at the hot melted cheese oozing out!
Biting into the crispy skin and tender meat reveals creamy melted cheese within! Quite a guilty pleasure indeed! :p
Method:
1. Pound, flatten and season pork meat
2. Sandwich a slice of processed cheese in between two pieces of meat (try to use cheese that's not immediately taken out from fridge so it will melt easily)
3. Cover the pork meat with egg yolk and breadcrumbs
4. Deep fry in hot oil and serve while hot and crispy

It was pretty good, except that it could do without Mrs. Dash spices and a little more cheese. (Mum used half a slice each, worrying about the sodium and phosphate content.) But overall, it was crispy and yummy for a first-try experiment!


[get this widget]
Recipe: Mum's Kong Bak Bao
Labels: -bao, -pork, +braised, +steamed, ~Chinese, Comfort Food, Mum's recipes, recipesMum braised some pork belly and we steamed some buns to create our own homemade 'Kong Bak' Bao. It was delicious, despite conscientiously reducing the salt and soy sauce!

Ingredients
Pork Belly
Dark Soy Sauce (just a little for colouring)
Sugar
Chinese Cooking Wine
A few cloves of Garlic
Light Soy Sauce
1 piece Star Anise ('Ba Jiao')
Water (just a little)
Salt to Taste (after simmer)
Method:
1. Blanch Pork Belly in hot water for a few seconds to remove blood and impurities. Remove and soak in cold water. Slice to desired thickness.
2.Put the sliced Pork Belly in a pot and add all the other ingredients. Do not add water. Simmer on low fire for at least an hour. Then add just half a cup of water and simmer another 2 hours. Refill every two hours. Repeat until fragrant and cooked to preferred doneness. Finally, add salt to taste.
3. Serve with steamed buns, lettuce, coriander and/or spring onion. Mum likes to go with red chillies and salted vegetable(soak in water first).
*sorry for no definite measurements, Mum does it "agar-agar"!


[get this widget]
It was my aunt's birthday so we went on a steak-out at New York New York and Surf N' Turf. She had a 1-for-1 main course voucher for Surf N' Turf, so we headed down to Funan. We both ordered the New York Tenderloin, I had the one with Mushroom Sauce while aunt had the one with Black Pepper Sauce. We also had a choice of potato side, and we both got a baked potato each!
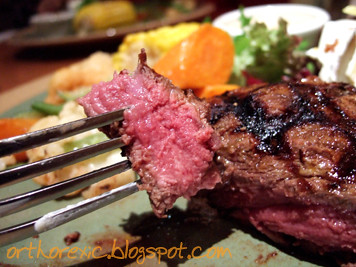
I ordered my steak Medium Rare because I don't like tough and dry steaks. The Mushroom Sauce didn't complement the steak very well and it was very salty. But it was just as well because I enjoyed the steak on its own, which was pink and very tender. We finished it off with a glass of lime juice!


[get this widget]
Recipe: Spaghetti Pomodoro
Labels: [low Calcium], [low Phosphate], [low Protein], ~Italian, Comfort Food, pasta, recipes, sauces, vegetarian
My homemade Spaghetti Al Pomodoro
Blend onion and garlic together. Fry in olive oil. You may add minced beef (optional). Add canned tomato puree, paste and sauce. Simmer and add
bayleaf (foglia di alloro), nutmeg powder (noce moscata) and beef stock (you can add more spices/herbs). Add salt to taste. Simmer for half an hour on slow fire.
The rich red colour is really appetising, isn't it? The result of the recipe can really vary with the mixture and kind of puree/paste/sauce used. We had to experiment with different brands and mixtures. The best recipe was the one pictured, but unfortunately we forgot to record the mixture! ):


[get this widget]
After much hiatus, the Orthorexic Foodie (yours truly) is back with more food photos, recipes and health articles than ever before!
The Blogger:
XY aka. Rexic in Makansutra.com Forums
Self-proclaimed Orthorexic (meaning "crazy about eating healthy food") Foodie; although I'm not really a connoisseur, I do love good food! Has a passion for cooking (even though I'm really bad at it) and Food Photography. Loves experimenting with food but hates washing dishes... :p Also a High-school Student sick of Canteen food.
The Blog:
Lots of Food photos and Recipes! Includes health articles which make this blog wonderfully paradoxical. Expect a more casual blog, no critical food reviews here. Feel free to comment or drop me an Email for new makan haunts and recipes I should try!


[get this widget]


